


Engraving adds character and charm, transforming everyday items into personalised keepsakes. One popular project is engraving a wooden or gift box. Whether it's a memory box, jewellery box, or presentation box, engraving can turn an ordinary piece into something meaningful and lasting.
This guide explores why engraved boxes remain so popular, outlines the main engraving methods available, and shares practical advice for laser engraving at home or in a small workshop. We'll also recommend suitable tools for both beginners and experienced makers.

In this article:
- Part 1: Why Do People Love To Engrave A Box
- Part 2: 5 Methods for Engraving a Box
- Method 1: Laser Engraving
- Method 2: CNC Engraving
- Method 3: Hand Engraving
- Method 4: Chemical Etching
- Method 5: Printing & Engraving Hybrids
- Part 3: How to Engrave a Box by Laser Engraving
- Part 4: Tips for Using Laser Engraving
- Part 5: FAQs about Engraving a Box
Part 1: Why Do People Love To Engrave A Box
Engraving a box is about far more than decoration. It allows you to add meaning, identity, and craftsmanship to an everyday object. Whether for personal use or commercial purposes, engraved boxes remain highly popular for several reasons:
Reason 1: Make It Totally You
Adding a name, date, quote, or custom design instantly transforms a plain box into a personalised keepsake. Engraved boxes are especially popular for weddings, anniversaries, graduations, and milestone birthdays, where thoughtful details matter.
Reason 2: A Refined Aesthetic
Clean lines and precise detailing can elevate even a simple wooden box. Laser engraving, in particular, creates sharp, elegant finishes that suit both modern and traditional styles.
Reason 3: Good for Business
Many retailers and small businesses engrave logos or brand elements onto packaging boxes. This approach strengthens brand identity and gives products a more premium appearance.
Reason 4: Built to Last
Unlike printed labels or stickers, engraved designs do not fade, peel, or wear away easily. This makes engraving a reliable option for keepsakes intended to last for years.
Reason 5: Emotional and Heirloom Value
An engraved jewellery box or memory box often becomes more than storage — it becomes part of a family story. The engraving preserves not just a design, but the memories attached to it.

Part 2: 5 Methods for Engraving A Box
There are several ways to engrave a box, depending on your budget, experience level, material choice, and production needs. Below is a comparison of the most common engraving methods used for wooden and gift boxes.
Method 1: Laser Engraving
Laser engraving has significantly transformed box customisation. It uses a focused beam of light to permanently mark or remove material with high precision. The process is fast, repeatable, and ideal for both single projects and batch production.
Laser engraving works well on:
- Wood
- Leather
- Acrylic
- Certain plastics
- Some coated or treated metals (depending on the laser type)
It is particularly suitable for logos, text, intricate patterns, and detailed artwork.
LP2 Plus – Compact and Versatile for Home Engraving
For hobbyists and home creators looking to engrave a box with speed and precision, the LaserPecker LP2 Plus offers a strong balance of power, portability, and safety.
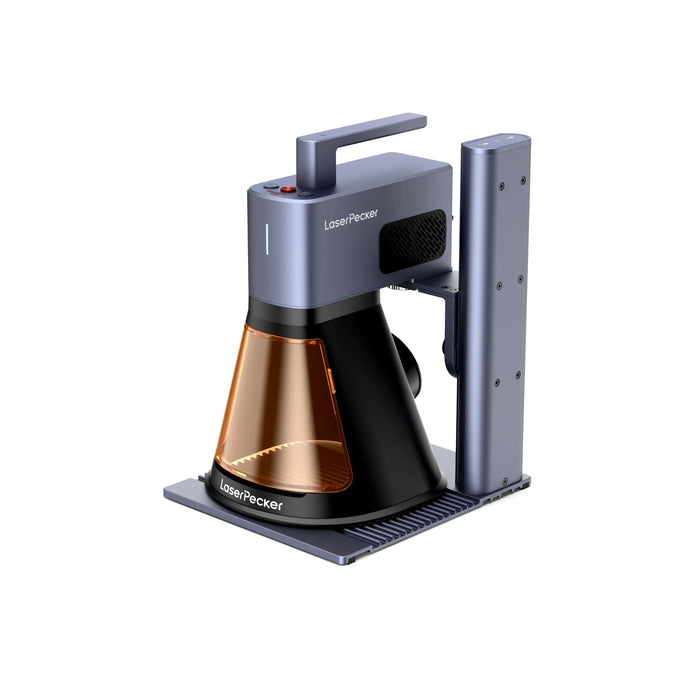
Feature 1: High Speed Performance
With engraving speeds of up to 4,000 mm/s, the LP2 Plus allows you to complete personalised wooden boxes efficiently. This is particularly useful for batch gift projects or small business packaging.
Feature 2: 10W 450nm Diode Laser Power
Its 10W blue diode laser provides sufficient power for engraving wood, leather, acrylic, and coated surfaces. For box engraving, this means clear contrast on hardwood lids and clean detail on logos or text.
Feature 2: Expandable Accessory Ecosystem
The LP2 Plus supports:
- Rotary attachments (ideal for cylindrical gift containers)
- Slide extensions for larger surfaces
- Multi-functional electric rollers
This flexibility allows users to engrave both flat wooden boxes and rounded packaging formats.
Feature 3: Enhanced Safety with Protective Enclosure
For UK users who prioritise safety in home workshops, pairing the LP2 Plus with a protective enclosure helps isolate the laser working area. This reduces accidental exposure and makes it more suitable for use in shared household spaces.
Feature 4: Cleaner Indoor Use with Air Purification
When engraving a box indoors, smoke and fine particles are generated. Using a compatible air purifier helps filter fumes and debris, maintaining cleaner air — particularly important in homes with children or pets.
The LP2 Plus is a reliable choice for creators who want faster engraving performance while maintaining a safe and comfortable home workshop environment.
LaserPecker LP4 - Advanced Dual-Laser Engraver
For professionals and growing businesses, the LaserPecker LP4 offers greater speed, material flexibility, and precision.

Feature 1: Dual-Laser System
Equipped with a 10W blue diode laser and a 2W infrared laser, it supports over 300 materials, including:
- Stainless steel
- Aluminium
- Ceramics
- Wood
- Acrylic
- Leather
This dual system enables both fine detailing and more demanding engraving tasks.
Feature 2: Professional Speed and Resolution
With speeds up to 4000 mm/s and 8K resolution, it produces sharp, consistent results suitable for commercial production.
Feature 3: Smart Control and Software Compatibility
The touchscreen interface allows quick laser switching and repeat jobs. It is compatible with LightBurn (professional software) and LaserPecker Design Space (simplified workflow).
Ideal for Business Growth
- Branding wooden boxes with engraved logos
- Producing detailed keepsake boxes
- Fulfilling wedding, corporate, and retail orders
Feature 4: Durability and Long-Term Performance
Built for consistent daily use, it reduces errors and improves workflow efficiency in small workshops.
The LaserPecker LP4 is suitable for professionals and small businesses scaling engraved box production.
Method 2: CNC Engraving
CNC (Computer Numerical Control) engraving uses rotating cutting tools to physically remove material.
Advantages:
- Produces deep cuts and textured finishes
- Suitable for hardwood and solid metals
- Creates dimensional engraving effects
Limitations:
- Slower than laser engraving
- Louder during operation
- Requires more maintenance
CNC engraving is often used in workshops producing robust wooden boxes or industrial projects.
Method 3: Hand Engraving
Hand engraving involves manual tools such as chisels and carving instruments.
Advantages:
- Traditional craftsmanship
- Each piece is unique
- Strong artistic value
Limitations:
- Time-consuming
- Requires significant skill
- Not suitable for bulk production
This method appeals to artisans who value handcrafted detail.
Method 4: Chemical Etching
Chemical etching uses acid or chemical solutions to create designs, primarily on metal surfaces.
Advantages:
- Suitable for fine text and detailed metal designs
- Consistent surface marking
Limitations:
- Requires careful chemical handling
- Not recommended for beginners
- Limited to certain materials
Method 5: Printing & Engraving Hybrids
Some box makers use UV printing and engraving. Printing adds colours, while engraving adds texture and keeps it lasting longer. This mix is often used for fancy packaging.
Comparison Summary for Box Customisation
| Method | Difficulty | Cost | Effect / Precision | Best For |
|---|---|---|---|---|
| Laser Engraving | Easy | Medium | High precision, repeatable, durable | Beginners, professionals, small businesses |
| CNC / Rotary Engraving | Medium | High | Deep cuts, textured finish, slower process | Workshops, industrial production |
| Hand Engraving | Hard | Low | Unique, handcrafted, inconsistent results | Artists, traditional craftsmen |
| Chemical / Acid Etching | Medium | Low–Medium | Detailed metal marking, safety considerations | Jewellery, metal crafts |
| Printing & Engraving Hybrids | Medium | Medium–High | Colour + texture combination, modern finish | Premium packaging, branded boxes |
Part 3: How to Engrave a Box by Laser Engraving
If you want to laser engrave a jewellery box smoothly and accurately, following a structured process will help ensure clean and professional results.
Step 1: Choose or Create Your Design
Start by preparing your artwork. You can:
- Design your own graphic using software such as LightBurn
- Import a ready-made vector file
- Use text tools to add names, dates, or messages
Make sure the file resolution is suitable for engraving, especially if you are working with detailed logos or fine text.
Step 2: Prepare the Box Surface
Before engraving, ensure the box is:
- Clean and free from dust
- Completely dry
- Positioned securely and evenly
If the lid or surface is uneven, use spacers or adjustable supports to stabilise it. A stable surface prevents distortion and improves engraving accuracy.
Step 3: Adjust Laser Settings
Correct settings are essential when laser engraving a box. Adjust:
- Speed
- Power intensity
- Resolution
Different materials (such as softwood, hardwood, or coated surfaces) require different configurations. Running a small test mark on a hidden area can help you fine-tune the settings.
Step 4: Preview the Engraving Area
Modern machines such as the LP2 Plus and LP4 include preview or framing features. These allow you to see exactly where the design will be engraved before starting.
This reduces errors and prevents material waste — particularly useful when engraving personalised items.
Step 5: Begin Engraving
Start the engraving process and monitor it throughout. Even with automated systems, it is important to:
- Stay nearby
- Ensure proper ventilation
- Observe for unexpected movement or overheating
For indoor workshops, using an air purifier or smoke extraction system improves air quality and comfort.
Step 6: Finishing and Surface Treatment
Once engraving is complete, you may wish to:
- Lightly sand the surface
- Apply oil or varnish
- Polish metal components
Finishing enhances contrast and protects the engraved design for long-term durability.
Part 4: Tips for Using Laser Engraving
Run a Test Sample First
Before engraving your final piece, always test your design on a spare piece of the same material. This allows you to:
- Confirm correct power and speed settings
- Check engraving depth and contrast
- Avoid damaging your finished box
Testing only takes a few minutes but can prevent costly mistakes.
Ensure Proper Ventilation
Laser engraving produces smoke and fine particles, particularly when working with wood or acrylic. For indoor use:
- Work in a well-ventilated area
- Use a fan or air extraction system
- Consider a desktop air purifier to improve air quality
Proper airflow helps maintain a safer and more comfortable workspace.
Adjust Settings for Each Material
Different materials respond differently to laser power. For example:
- Softwood generally requires lower power
- Hardwood may require slower speed for deeper contrast
- Acrylic needs controlled power to avoid melting
Small adjustments to speed and intensity can significantly improve engraving precision.
Keep the Lens and Components Clean
Dust or residue on the laser lens can reduce accuracy and engraving sharpness. Regularly:
- Inspect the lens
- Clean it with appropriate tools
- Remove debris from the work area
Routine maintenance ensures consistent results and extends machine lifespan.
Prioritise Safety at All Times
Always follow recommended safety guidelines:
- Wear appropriate laser safety glasses when required
- Never leave the machine unattended during operation
- Keep flammable materials away from the engraving area
If using a Class 1 enclosed system, safety risks are reduced; however, supervision is still essential when engraving.
Part 5: FAQs about Engraving a Box
Q1. Can I engrave any type of box?
Most boxes made from wood, leather, acrylic, and certain plastics can be laser engraved. Cardboard and coated materials may also work, depending on the laser type and power.
For beginners, softer materials such as bamboo or pine are easier to engrave and require lower power settings. Hardwoods and metals typically require higher-powered machines or specialised laser types.
Always test a small hidden corner first to confirm settings and avoid damaging the final piece.
Q2. How deep does laser engraving go on a wooden box?
Laser engraving typically reaches a depth of approximately 0.1 mm to 1 mm. The final depth depends on:
- Material density
- Laser power
- Engraving speed
- Number of passes
For a subtle surface mark, one pass is usually sufficient. For deeper engraving, multiple passes can be used — allowing time between passes to prevent overheating or warping.
If you require deep carving beyond surface engraving, CNC routing may be more suitable.
Q3. Is hand engraving better than laser engraving?
It depends on your objective.
Hand engraving offers:
- Unique, handcrafted character
- Artistic individuality
- Traditional craftsmanship appeal
Laser engraving offers:
- High precision
- Repeatable results
- Faster production
- Suitable for detailed logos and text
For commercial or repeat orders, laser engraving is generally more efficient. Some creators combine both techniques for decorative enhancement.
Q4. Can I engrave multiple boxes at once?
Yes. Batch engraving is possible, particularly when using jigs or alignment fixtures to secure multiple boxes.
To ensure consistency:
- Confirm focus and alignment
- Use identical material batches
- Test settings before full production
Higher-speed machines improve efficiency for larger orders, especially for weddings, corporate gifts, or retail packaging.
Q5. Is laser engraving safe to use at home in the UK?
Laser engraving can be safe for home workshops when proper precautions are taken:
- Ensure adequate ventilation
- Use safety-rated equipment where possible
- Avoid leaving machines unattended
- Follow manufacturer safety guidelines
Enclosed or safety-rated systems reduce exposure risks, but supervision remains essential.
Q6. Do I need planning permission to run a laser engraver at home in the UK?
For hobby use, planning permission is generally not required. However, if operating as a registered business from home, you should check local council regulations regarding noise, ventilation, and business activity.
Q7. What is the best wood for engraving a gift box in the UK?
Popular options include:
- Pine (affordable and easy to engrave)
- Birch plywood (smooth finish)
- Oak (durable and premium look)
Softer woods produce faster engraving results, while hardwoods provide stronger contrast and durability.
Conclusion
Engraving makes it simple to transform a plain box into a meaningful keepsake. Whether you are adding a name, a message, or a detailed design, engraving allows you to create something personal, durable, and visually distinctive.
There are several methods available — from traditional hand engraving and CNC routing to chemical etching. However, laser engraving remains one of the most versatile and efficient solutions, particularly for personalised wooden boxes and small business packaging.
For beginners exploring laser engraving at home, the LP2 Plus offers an affordable and portable way to get started. It is well suited to hobby projects, gift boxes, and small creative work.
For professionals and growing businesses, the LaserPecker LP4 provides greater speed, broader material compatibility, and consistent precision. It supports scalable production while maintaining high-quality engraving results.
Whether you are creating a personalised gift, enhancing branded packaging, or experimenting with a new craft, engraving a box combines creativity, technology, and lasting value in one rewarding process.


